If you’ve noticed your aloe plant looking worse for wear, there’s still hope to revive it. Here, expert gardener Emily Horn reveals her secrets to rescuing a struggling Aloe Vera.
Cacti & Succulents
7 Steps to Bring Back to Life a Struggling Aloe Vera Plant
Your aloe plant may exhibit signs of distress, such as droopy leaves or changes in color, even with proper watering. Identifying the cause of its decline is crucial for effective revival.
Investigate the factors leading to your aloe’s decline, pinpointing the potential culprits behind its struggles, to prevent recurring issues.
Ready to breathe new life into your aloe? Follow these steps to bring back its vibrancy, regardless of the initial cause of decline.
Step 1: Container Check

While visually appealing containers are tempting, they must also be practical for your aloe’s well-being.
Container Size Matters

The correct pot size allows room for root expansion, facilitating water absorption essential for aloe’s health.
On the contrary, oversized pots can lead to water retention issues, especially detrimental for desert plants like aloe.
Importance of Drainage

Drainage holes are vital for preventing water saturation and root rot in houseplants like aloe.
If you’re keen on decorative but impractical containers, use them as catch pots to avoid direct planting.
Reusing Containers Safely

Prioritize cleanliness when reusing pots to prevent potential contamination from previous plant use.
When preparing to repot your aloe plant, begin by thoroughly cleaning the pot. Use a stiff brush to remove any remaining debris. Then, clean the pot with mild dish soap and water, making sure to sanitize it afterwards either with rubbing alcohol or a bleach solution.
Step 2: New Potting Soil
To rejuvenate your aloe, replace the potting mix with a high-quality desert mix. This blend will provide essential nutrients and proper drainage for your succulent to flourish.
For optimal growth, the potting mix should contain a mix of organic and inorganic materials to support your aloe’s health.
Step 3: Prune Roots Before Repotting
Prior to repotting, carefully inspect the roots. Remove any brown or black roots with a mushy texture. Healthy roots of aloe appear thick and tan, orange, or yellow in color.
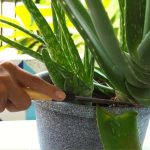
Prepare to prune away any damaged roots to promote new root growth. Use sanitized pruners to remove dead roots, wiping the blades between cuts to prevent the spread of diseases.
Step 4: Prune The Top
If your aloe lacks a root system, consider pruning the top of the plant. Assess which leaves or shoots need trimming to prevent the plant from toppling over.
Trim leaves close to the base to avoid stumps on the stem. After pruning, your aloe might appear different; allow new growth or use cuttings to start new plants.
Step 5: Take & Plant Cuttings
Finally, consider taking and planting cuttings of your aloe. Utilize fresh potting mix and plant the cuttings to propagate new aloe plants for a flourishing collection.
Final Thoughts
Don’t lose hope just yet when your aloe plant seems beyond saving. It’s possible that the root system is too damaged or the leaves have become mushy, indicating the need to dispose of the mother plant. However, before giving up completely, consider taking a cutting from your aloe for propagation.
To propagate through leaf cuttings, identify a healthy, green leaf on the plant. Use a clean, sharp knife to cut the leaf near its base. For stem cuttings, trim the stem near the plant’s base, ensuring a stem length of about 2-3″ without lower leaves.
After obtaining your cutting, allow it to callus over for a few days before planting. Callusing is essential as it creates a protective layer on the cut end, guarding against soil-borne pathogens. Plant the cutting in a pot filled with desert mix, ensuring it is in direct soil contact and place it in a bright, sunlit spot.
Remember to water your aloe cutting frequently until roots develop, adjusting the watering schedule to prevent overhydration. Thoroughly water the plant by allowing water to drain through the pot. This method ensures all roots receive moisture evenly, decreasing the need for frequent watering and helping prevent root rot.
Provide your aloe cutting with bright, indirect light by placing it near a window with southern, western, or eastern exposure. With at least 6 hours of sunlight daily, your aloe will thrive in its new environment.
Despite setbacks, remember that plants have an instinct to survive. By identifying and rectifying any issues, your aloe plant will likely rebound. So, don’t lose heart – with a little care and attention, both you and your plant can look forward to a flourishing future together.


